Webasto Diesel Heater Manual: A Comprehensive Guide
This manual details Webasto diesel heater operation‚ troubleshooting‚ and maintenance‚ covering fuel lines‚ electrical connections‚ and error codes like F12.

Understanding Your Webasto Diesel Heater
Webasto diesel heaters offer efficient and reliable warmth‚ commonly utilized in vehicles like VW T5s and diesel engine-based systems. These heaters employ catalytic combustion for optimal performance‚ requiring pre-operational checks to ensure smooth starting‚ especially in colder climates.
Understanding the system involves recognizing its core function: providing heat independent of the engine. This is achieved through a diesel combustion process‚ carefully controlled for safety and efficiency. The heater’s operation relies on a consistent fuel supply and proper electrical connections. Familiarizing yourself with potential issues‚ such as error codes (like F12 indicating a lockout)‚ is crucial for effective troubleshooting.
Proper usage‚ as outlined in the user guide‚ includes adhering to safety precautions and following the recommended maintenance schedule. Regular cleaning and filter replacement are vital for longevity and optimal heating performance.
Key Components and Their Functions
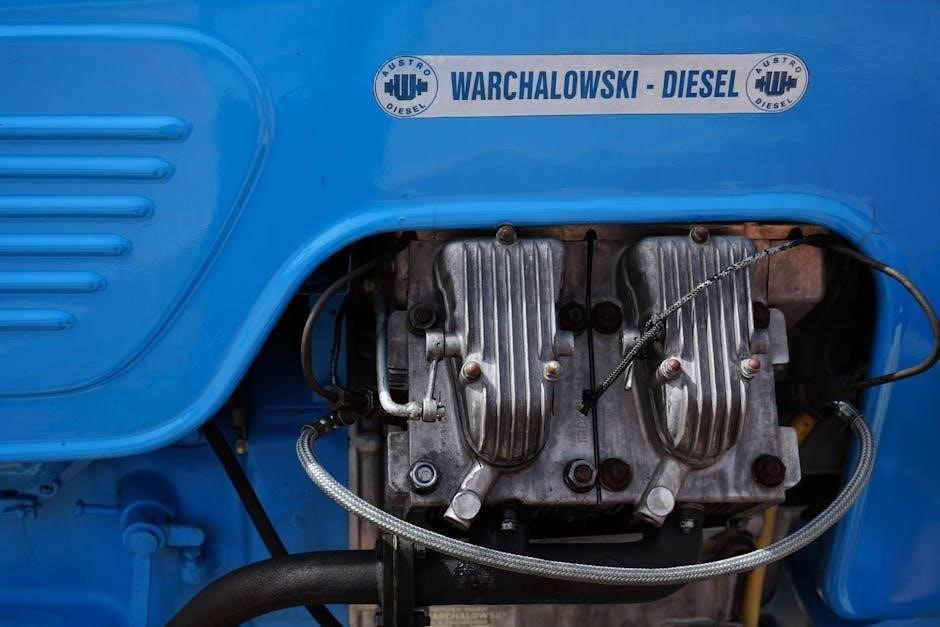
A Webasto diesel heater comprises several vital components working in unison. The fuel pump ensures a consistent diesel supply‚ while the combustion chamber facilitates efficient fuel burning. Crucially‚ the control element manages operation‚ including settings for heating modes and temperature adjustments. Electrical connections power the system‚ and a wiring harness distributes electricity.
The heater also features a catalytic combustor‚ enhancing efficiency and reducing emissions. A crucial safety feature is the fuse within the wiring harness‚ protecting against electrical faults. The combination timer offers programmable operation‚ allowing for pre-heating and automated control. Understanding each component’s role is essential for troubleshooting and maintenance.
Proper function of these parts guarantees reliable heat output and system longevity‚ as detailed in the Webasto heater user guide.
Safety Precautions and Warnings
Prior to operating your Webasto diesel heater‚ heed all safety precautions. Never operate the heater near flammable materials‚ and ensure adequate ventilation to prevent carbon monoxide buildup. Always disconnect the power supply before performing any maintenance or service. Be cautious of hot surfaces during and after operation to avoid burns.
If an error code‚ such as F12 (heater lockout)‚ appears‚ immediately turn the system off and consult the manual for troubleshooting steps. Do not attempt to modify or repair the heater yourself; contact a qualified technician. Adhere to all local regulations regarding fuel storage and heater installation.
Vehicle drivers should refrain from bringing firearms near the heater system. Always set the control element to ‘OFF’ before restarting‚ or use the Quick Heat button on the timer.
Installation and Setup
Proper installation involves secure fuel line connections and correct wiring‚ ensuring safe and efficient heater operation. Initial testing verifies functionality.
Proper Fuel Line Connection
Establishing a secure fuel line is paramount for safe and reliable heater performance. Utilize fuel lines specifically designed for diesel applications‚ ensuring compatibility with Webasto systems. Avoid kinks or sharp bends that could restrict fuel flow‚ potentially leading to operational issues or even heater shutdown.
Connections must be airtight to prevent fuel leaks‚ a significant fire hazard. Employ appropriate clamps and fittings‚ tightening them to the manufacturer’s specified torque. Regularly inspect the fuel line for signs of wear‚ damage‚ or deterioration‚ replacing it immediately if any issues are detected.
Ensure the fuel line is routed away from hot exhaust components and moving parts to prevent damage. Proper fuel filtration is also crucial; a clogged filter can starve the heater‚ causing malfunctions. Always follow the Webasto installation guidelines for fuel line routing and connection procedures.
Wiring and Electrical Connections
Correct wiring is critical for the safe and efficient operation of your Webasto diesel heater. Always disconnect the vehicle’s battery before commencing any electrical work. Use appropriately sized wiring‚ adhering to the heater’s voltage and amperage requirements‚ to prevent overheating and potential fire hazards.
Ensure all connections are secure and protected from moisture and corrosion. Utilize weatherproof connectors and properly route wiring away from heat sources and moving parts. A dedicated fuse‚ sized according to the heater’s specifications‚ is essential for circuit protection.
Double-check all connections against the wiring diagram provided in this manual. Incorrect wiring can lead to heater malfunction or damage to the vehicle’s electrical system. If unsure‚ consult a qualified automotive electrician.
Initial Startup and Testing
After completing the installation and verifying all connections‚ proceed with the initial startup and testing phase. Before ignition‚ ensure adequate ventilation to prevent carbon monoxide buildup. Prime the fuel line by operating the fuel pump until fuel reaches the heater.

Turn the heater on using the control panel‚ observing for any unusual noises or smells. Monitor the heater’s operation through several heating cycles‚ checking for proper combustion and airflow. If an error code‚ such as F12 (heater lockout)‚ appears‚ consult the troubleshooting section of this manual.
Verify the heater is producing heat and that the fan is operating correctly. A thorough initial test ensures proper functionality and identifies any potential issues before extended use.

Operating Instructions
Mastering your Webasto heater involves understanding the control panel‚ heating modes‚ temperature adjustments‚ and fan speed settings for optimal comfort and efficiency.
Control Panel Overview
The Webasto diesel heater control panel is the central hub for managing your heating system. It typically features a digital display indicating heater status‚ temperature settings‚ and any active error codes. Key buttons include power on/off‚ temperature adjustment (up and down)‚ and fan speed control. Some models incorporate a ‘Quick Heat’ function for rapid warm-up.
Understanding the panel’s symbols is crucial; a flashing error code‚ such as F12 (heater lockout)‚ signals a problem requiring attention. The display also shows the currently selected heating mode – automatic‚ manual‚ or night mode – each offering different operational characteristics. Familiarize yourself with the panel’s layout and functions to ensure efficient and safe operation of your Webasto heater. Proper use of the control panel maximizes comfort and extends the heater’s lifespan.
Heating Modes and Settings
Webasto diesel heaters offer versatile heating modes to suit various needs. Manual mode provides direct control over heat output and fan speed‚ allowing precise temperature regulation. Automatic mode maintains a pre-set temperature‚ adjusting heat output as needed for consistent comfort. Night mode operates at a lower fan speed and reduced heat output‚ ideal for quiet‚ energy-efficient overnight heating.
Settings often include a timer function‚ enabling scheduled operation. The ‘Quick Heat’ setting delivers maximum heat output for rapid cabin warming. Some advanced models feature altitude compensation‚ optimizing combustion efficiency at higher elevations. Understanding these modes and settings allows users to customize their heating experience‚ balancing comfort‚ fuel efficiency‚ and noise levels. Always consult the manual for specific model capabilities.
Adjusting Temperature and Fan Speed
Precise temperature control is achieved via the Webasto control panel. Typically‚ dedicated buttons or a rotary dial allow incremental temperature adjustments‚ displayed in Celsius or Fahrenheit. Fan speed is similarly adjustable‚ ranging from low for quiet operation to high for rapid heating. Many systems offer automatic fan control‚ modulating speed based on the desired temperature difference.
Understanding the relationship between temperature setting and fan speed is crucial for optimal comfort and fuel efficiency. Lower fan speeds conserve energy‚ while higher speeds deliver quicker warmth. Some models feature programmable temperature profiles‚ allowing customized heating schedules. Regularly checking the heater’s responsiveness to adjustments ensures proper functionality. Refer to your specific model’s manual for detailed instructions.

Troubleshooting Common Issues
Diagnosing Webasto heater problems involves checking error codes‚ fuel supply‚ and electrical faults; F12 indicates a heater lockout requiring fuse inspection.
Error Codes and Their Meanings (e.g.‚ F12)
Webasto diesel heaters utilize error codes to pinpoint malfunctions‚ streamlining the troubleshooting process. A flashing F12 error code specifically signals a heater lockout condition. This commonly arises from interrupted combustion or a safety system activation. Before attempting a restart‚ ensure the control element is switched to the ‘OFF’ position‚ or briefly press the ‘Quick Heat’ button on a combination timer if installed.
Further investigation requires checking the fuse located within the wiring harness extending from the heater unit – typically a standard automotive-type fuse. Beyond F12‚ other codes indicate diverse issues‚ ranging from low voltage to fuel pump failures or sensor discrepancies. Consulting the complete Webasto error code list‚ found within the comprehensive manual‚ is crucial for accurate diagnosis and effective repair. Ignoring error codes can lead to recurring problems or potential damage.
Addressing Fuel Supply Problems
Consistent fuel delivery is paramount for optimal Webasto diesel heater performance. Fuel supply issues manifest as intermittent operation‚ weak heating‚ or complete failure to ignite. Begin by verifying the diesel tank contains sufficient fuel and that the fuel line isn’t kinked or obstructed. Inspect the fuel filter for contamination – a clogged filter severely restricts flow.
The fuel pump is a frequent culprit; listen for its operation during the heater’s startup sequence. If silent‚ check the pump’s electrical connection and fuse. Air trapped within the fuel line can also cause problems; bleeding the line‚ following the manufacturer’s procedure‚ is often necessary. Ensure the diesel fuel is clean and meets the heater’s specifications; Using contaminated or incorrect fuel can damage the fuel pump and other components‚ necessitating costly repairs.
Diagnosing Electrical Faults
Electrical issues can significantly impede Webasto diesel heater functionality. Begin by meticulously checking all wiring connections for looseness‚ corrosion‚ or damage. A faulty fuse is a common cause; inspect and replace any blown fuses with the correct amperage rating. Utilize a multimeter to verify voltage at the heater and control panel‚ ensuring it aligns with the manufacturer’s specifications.
Error codes‚ such as F12 indicating heater lockout‚ provide valuable diagnostic clues. Consult the manual for specific code interpretations. Examine the wiring harness for breaks or shorts‚ paying close attention to areas prone to chafing. The control panel itself may be defective; testing its operation independently can isolate the problem. Remember to disconnect the power supply before performing any electrical work to prevent shocks or damage.
Maintenance and Service
Regular cleaning‚ filter replacements‚ and proper storage are crucial for optimal Webasto heater performance and longevity‚ ensuring reliable heating throughout seasons.
Regular Cleaning Procedures
Maintaining a clean Webasto diesel heater is paramount for efficient operation and longevity. Dust and debris accumulation can significantly reduce performance and even lead to malfunctions. Begin by ensuring the heater is completely cool and the power is disconnected. Carefully inspect the exterior of the unit‚ removing any visible dust or grime with a soft‚ dry cloth.
Pay particular attention to the air intake and exhaust vents‚ ensuring they are free from obstructions. For internal cleaning‚ consult the detailed service manual for specific disassembly instructions. Avoid using harsh chemicals or abrasive cleaners‚ as these can damage sensitive components. A gentle vacuum cleaner with a brush attachment can be used to remove loose particles from within the heater housing. Regular preventative cleaning‚ performed at least seasonally‚ will minimize the risk of costly repairs and ensure consistent‚ reliable heating performance. Remember safety first – always disconnect power!
Filter Replacement Schedule
Consistent filter replacement is crucial for optimal Webasto diesel heater performance and preventing fuel-related issues. The fuel filter safeguards the heater from contaminants that can cause blockages and malfunctions. A general guideline suggests replacing the fuel filter every 500 operating hours‚ or at least annually‚ whichever comes first.
However‚ this schedule may vary depending on the fuel quality and operating environment; more frequent changes are recommended if using lower-grade diesel. Always use a genuine Webasto replacement filter to ensure proper fit and filtration efficiency. Before replacing the filter‚ depressurize the fuel system. Consult the service manual for detailed instructions on filter location and replacement procedures. Ignoring filter replacement can lead to reduced heating output‚ increased fuel consumption‚ and potential damage to the heater’s fuel pump and combustion chamber.
Long-Term Storage Guidelines
Proper preparation is essential when storing your Webasto diesel heater for extended periods to prevent damage and ensure reliable operation upon reactivation. Before storage‚ thoroughly flush the fuel system to remove any residual diesel that could degrade and cause blockages. Disconnect the fuel line and drain all remaining fuel from the heater and pump.

Additionally‚ disconnect the electrical connections‚ including the battery‚ to prevent corrosion. Cover the heater’s air intake and exhaust outlets to prevent the entry of dust‚ moisture‚ and insects. Store the heater in a clean‚ dry environment. Upon removal from storage‚ inspect all connections and filters before restarting. A brief “dry run” – operating the heater briefly without fuel – can help purge any remaining air from the system.

Advanced Features and Options
Explore combination timers for scheduling‚ catalytic combustion for efficiency‚ and pre-operational diesel engine checks for optimal Webasto heater performance and control.
Using a Combination Timer
A combination timer significantly enhances Webasto heater functionality‚ allowing for pre-programmed heating schedules and convenient operation. Before restarting the heater after addressing issues‚ ensure the control element is switched to ‘OFF’ or utilize the ‘Quick Heat’ button on the timer itself. This prevents unexpected start-ups and ensures safe operation.
These timers offer precise control over heating cycles‚ enabling users to set specific start and stop times‚ optimizing comfort and fuel efficiency. They often include features like daily or weekly programming‚ allowing for customized heating plans tailored to individual needs. Properly configured‚ a combination timer maximizes the benefits of your Webasto diesel heating system‚ providing consistent warmth when and where it’s needed most‚ while minimizing energy consumption.
Understanding Catalytic Combustion
Webasto diesel heaters employ catalytic combustion‚ a highly efficient process minimizing emissions and maximizing heat output. Unlike traditional combustion‚ catalytic combustion utilizes a catalyst – often platinum – to facilitate a cleaner‚ more complete burn of the diesel fuel. This process significantly reduces soot and harmful exhaust gases‚ contributing to a more environmentally friendly heating solution.
The catalyst lowers the activation energy required for combustion‚ enabling the fuel to burn at lower temperatures. This results in a quieter operation and reduced risk of overheating. Maintaining the catalyst’s integrity is crucial for optimal performance; regular maintenance and proper fuel quality are essential. Understanding this process allows for informed troubleshooting and ensures your Webasto heater operates at peak efficiency‚ providing reliable and clean heat.
Pre-Operational Checks for Diesel Engines
Before initiating your Webasto diesel heater‚ particularly in colder climates‚ several pre-operational checks are vital for ensuring reliable startup and optimal performance. Verify sufficient diesel fuel is present in the tank‚ and the fuel lines are free from any obstructions or kinks. Inspect the fuel filter for cleanliness‚ as a clogged filter can prevent proper fuel delivery.
Confirm the vehicle’s battery is adequately charged‚ as the heater draws significant power during startup. Check all wiring connections for corrosion or looseness‚ ensuring a secure electrical circuit. Finally‚ ensure the exhaust outlet is clear of any debris‚ preventing backpressure and potential carbon monoxide buildup. These simple checks minimize the risk of operational issues and guarantee a warm‚ comfortable experience.